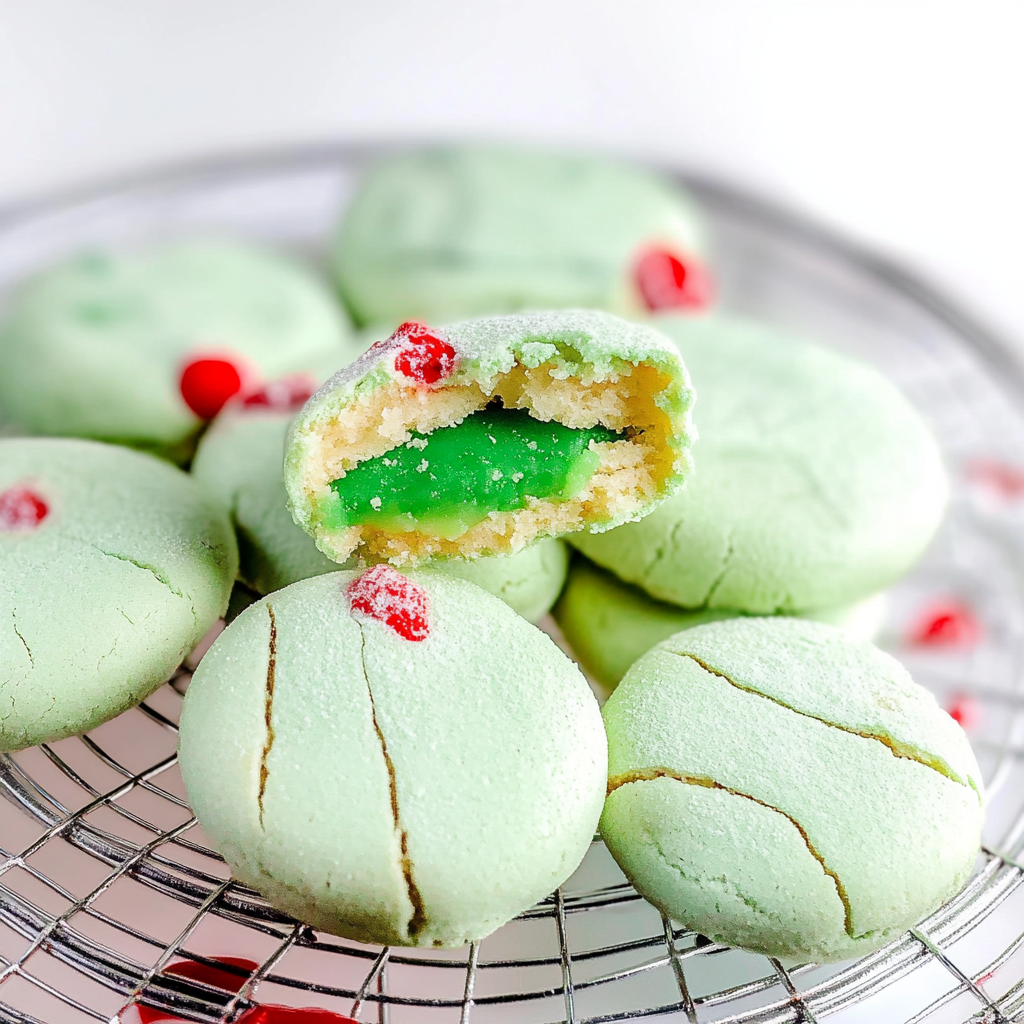
There’s something utterly magical about cookies that can make even the grumpiest of Grinches crack a smile. Imagine these vibrant green treats, bursting with sweet flavor and topped with cheerful red sprinkles, bringing joy to your holiday gatherings. The aroma wafts through the air, promising delightful bites filled with buttery goodness.
Jump to:
- Ingredients for grinch cookies
- How to Make grinch cookies
- <strong>Perfecting the Cooking Process</strong>
- <strong>Add Your Touch</strong>
- <strong>Storing & Reheating</strong>
- FAQs:
- What are Grinch Cookies?
- How do I store Grinch Cookies?
- Can I customize my Grinch Cookies?
- Are Grinch Cookies suitable for gift-giving?
- Conclusion for Grinch Cookies:
- 📖 Recipe Card
Now, let’s get real here—who doesn’t want to bake a batch of cookies that not only taste like Christmas spirit but also look like they came straight out of Whoville? Whether you’re surprising friends at a cookie exchange or indulging in a cozy night with cocoa, these grinch cookies will have you feeling merry and bright!
Why You'll Love This Recipe
- These grinch cookies are incredibly easy to prepare, making them perfect for bakers of any skill level.
- Their vibrant color and festive appearance will steal the show at any holiday gathering.
- With a delightful minty flavor and chewy texture, they are sure to please everyone’s palate.
- Plus, they’re versatile enough to be enjoyed year-round; who says you can’t have green cookies in July?
Ingredients for grinch cookies
Here’s what you’ll need to make this delicious dish:
- Butter: Use unsalted butter for the best flavor; it allows you to control the saltiness in your dough.
- Granulated Sugar: This adds sweetness and helps achieve that lovely chewy texture we all love in cookies.
- Brown Sugar: The molasses in brown sugar gives depth and moisture, creating a soft cookie that melts in your mouth.
- Eggs: Eggs bind the ingredients together and add richness; room temperature eggs work best for even mixing.
- Vanilla Extract: A splash of vanilla enhances the overall flavor profile; always opt for pure vanilla extract if possible.
- Baking Soda: This leavening agent helps your cookies rise beautifully, giving them that perfect fluffy texture.
- Flour: All-purpose flour is ideal for structure; be careful not to overmeasure as it can lead to dense cookies.
- Green Food Coloring: This is what gives our grinch cookies their signature color; use gel coloring for a more vibrant hue.
- Minty Chocolate Chips: Choose mint-flavored chocolate chips for an extra festive twist that complements the green color perfectly.
- Red Sprinkles: These add a pop of color and fun on top; feel free to go wild with your sprinkle choices!
The full ingredients list, including measurements, is provided in the recipe card directly below.
How to Make grinch cookies
Follow these simple steps to prepare this delicious dish:
Step 1: Preheat Your Oven
Preheat your oven to 350°F (175°C). Line two baking sheets with parchment paper so your cookies don’t stick like gum on a shoe.
Step 2: Cream Butter and Sugars
In a large mixing bowl, cream together softened unsalted butter, granulated sugar, and brown sugar until light and fluffy. You’ll want it to look like clouds—fluffy clouds!
Step 3: Add Eggs and Vanilla
Crack in those room-temperature eggs one at a time and mix until well combined. Toss in the vanilla extract as well because who doesn’t love the smell of vanilla wafting through their kitchen?
Step 4: Mix Dry Ingredients
In another bowl, whisk together flour, baking soda, and green food coloring. Slowly add this mixture into your wet ingredients while mixing until everything is just combined—don’t overmix or you’ll end up with tough cookies instead of soft ones.
Step 5: Fold in Minty Chips
Gently fold in those minty chocolate chips. You can sneak a few extra into your mouth at this point because it’s basically quality control!
Step 6: Bake Those Cookies
Scoop tablespoon-sized balls of dough onto your prepared baking sheets about two inches apart—these little guys spread! Sprinkle some red sprinkles on top before popping them into the oven for around 10-12 minutes or until the edges are golden brown.
Transfer to plates and watch as everyone gathers around these cute little Grinch creations. Serve warm with milk or hot cocoa because there’s no better way to celebrate than with good company and scrumptious treats!
You Must Know
- These Grinch cookies are not just your average holiday treat; their vibrant green color and delightful peppermint twist will steal the show.
- Perfect for festive gatherings, they are easy to make and even easier to share, turning any frown upside down.
Perfecting the Cooking Process
Start by preheating your oven to 350°F (175°C). While it warms up, mix your butter and sugars until fluffy. Then add the egg and vanilla, followed by the dry ingredients. Scoop onto a baking sheet and don’t forget to sprinkle with chocolate chips before baking!
Add Your Touch
Feel free to swap out the peppermint extract for almond or vanilla for a different flavor kick. You can also add crushed candy canes or nuts for extra crunch. Make these cookies truly yours!
Storing & Reheating
Store your Grinch cookies in an airtight container at room temperature for up to a week. For reheating, pop them in the microwave for about 10 seconds to bring back that fresh-baked goodness.
Chef's Helpful Tips
- Use room temperature butter for better mixing; this creates a smoother dough.
- Monitor baking time closely; even one minute can change the texture.
- Chill the dough briefly if it feels too sticky before scooping.
The first time I made Grinch cookies, my niece declared them “the best thing ever!” Nothing warms a heart like cookie compliments from a five-year-old chef-in-training!
FAQs:
What are Grinch Cookies?
Grinch cookies are festive treats inspired by the beloved Dr. Seuss character, the Grinch. These cookies are typically bright green and often feature red candy hearts or chocolate chips to resemble the Grinch’s mischievous nature. They’re perfect for holiday gatherings and offer a fun, whimsical twist to traditional cookies, making them a hit with both kids and adults alike.
How do I store Grinch Cookies?
To keep your Grinch cookies fresh, store them in an airtight container at room temperature. If you want to extend their shelf life, you can freeze them for up to three months. Just make sure they are completely cooled before packing them away. When you’re ready to enjoy them again, thaw them at room temperature for a delicious treat anytime.
Can I customize my Grinch Cookies?
Absolutely! You can personalize your Grinch cookies by adding different mix-ins like nuts or dried fruit. Switching up the type of chocolate used, or even incorporating flavored extracts like peppermint or vanilla, can add unique flavors. The bright green color is versatile, so feel free to experiment with your favorite ingredients while keeping that festive spirit alive.
Are Grinch Cookies suitable for gift-giving?
Yes, Grinch cookies make delightful gifts during the holiday season! Their vibrant color and fun design will surely bring smiles to friends and family members. Package them in decorative boxes or tins with a festive ribbon for an extra special touch. These cookies not only taste great but also add a cheerful vibe to any gift-giving occasion.
If you’re craving more sweet treats, explore these delightful dessert recipes for your next baking adventure.
Conclusion for Grinch Cookies:
Grinch cookies are a playful and delicious way to celebrate the holiday season. With their eye-catching green color and sweet toppings, they appeal to all ages. Storing them properly ensures you can enjoy these festive treats longer. Don’t hesitate to customize your recipe for even more fun! Whether making them for yourself or gifting them to others, these cookies bring joy and flavor into every celebration.
Did You Enjoy Making This Recipe? Please rate this recipe with ⭐⭐⭐⭐⭐ or leave a comment.
📖 Recipe Card
Print
Delightful Grinch Cookies
- Total Time: 27 minutes
- Yield: Approximately 24 cookies 1x
Description
These vibrant green Grinch cookies are a festive treat, bursting with minty flavor and topped with cheerful red sprinkles. Perfect for holiday gatherings or cozy nights in.
Ingredients
- 1 cup unsalted butter, softened
- 1 cup granulated sugar
- 1/2 cup brown sugar, packed
- 2 large eggs (room temperature)
- 2 tsp pure vanilla extract
- 1 tsp baking soda
- 3 cups all-purpose flour
- 1 tbsp green food coloring (gel)
- 1 cup mint-flavored chocolate chips
- 1/4 cup red sprinkles
Instructions
- 1. Preheat Oven
- Preheat your oven to 350°F (175°C). Line two baking sheets with parchment paper.
- 2. Cream Butter and Sugars
- In a large mixing bowl, cream together the softened butter, granulated sugar, and brown sugar until light and fluffy.
- 3. Add Eggs and Vanilla
- Mix in the eggs one at a time, followed by the vanilla extract until well combined.
- 4. Mix Dry Ingredients
- In another bowl, whisk together the flour and baking soda. Gradually add this mixture to the wet ingredients until just combined. Avoid overmixing.
- 5. Add Color and Chips
- Stir in the green food coloring until evenly distributed. Gently fold in the mint chocolate chips.
- 6. Scoop and Bake
- Scoop tablespoon-sized balls of dough onto prepared baking sheets, spacing them about two inches apart. Sprinkle red sprinkles on top before baking for 10-12 minutes or until edges are golden brown.
- 7. Cool and Serve
- Transfer cookies to a plate and allow them to cool slightly before serving warm with milk or hot cocoa.
- Prep Time: 15 minutes
- Cook Time: 12 minutes
- Category: Dessert
- Method: Baking
- Cuisine: American
Nutrition
- Serving Size: 1 cookie (30g)
- Calories: 140
- Sugar: 10g
- Sodium: 60mg
- Fat: 7g
- Saturated Fat: 4g
- Unsaturated Fat: 3g
- Trans Fat: 0g
- Carbohydrates: 18g
- Fiber: <1g
- Protein: <1g
- Cholesterol: 25mg